Tired of feeling limited in your design options? Images can really open doors when it comes to Powerpoint Design. However, even with images, sometimes you can feel stuck in a box. Let’s explore a great way to break out of that box. By cropping images to shapes, you’re able to quite literally get out of the boxy design that you feel is holding you back, and explore new territory!
Why Crop Image to Shape?
Sometimes, when designing a deck, you realize it needs a bit more fun and character. Enter: crop image to shape. Have a slide introducing your team with headshots? What if instead of those headshots being in their typical square or rectangle, they were circles? Breaking the mold, even just a bit, helps add color and interest to slides that are often pretty predictable. When you’re looking to shake things up but have pretty standard content to contend with, cropping images to shapes can certainly help!
Do’s and Don’ts
We still suggest sticking to somewhat traditional shapes, depending on your slide deck. Hey, if your brand lends itself to stars, that’s great! But most applications of this photo treatment should be more standard shapes. The shapes we utilize most often are circles, ovals, parallelograms, and triangles. With these shapes, you still have a ton of options! For example, you can craft a triangle to serve as an arrow pointing to information on the slide. Really lean into the shapes your brand already uses, and find fresh, new ways to bring those to life.
Crop Image to Shape Tutorial
Here– with another life-giving tutorial– we have Kyle, our Art Director. He’ll show you how to crop images to shapes in just a few quick steps!
Step-by-Step
As always, we’ve written out the steps for you here for reference!
Note, that when cropping image to shape, the picture is automatically trimmed to fill the geometry of the selected shape while maintaining its proportions.
1. Use Insert > Picture from file to add the image to your PowerPoint presentation (You can also just drag from your desktop into the presentation)
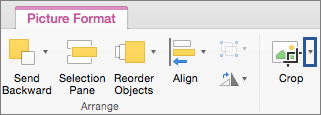
2. With your picture selected, find the crop feature in the Picture Format toolbar. Clicking into this feature provides you with crop options.
3. Click the arrow next to Crop, then select Crop to Shape
4. Select the shape you’d like to utilize, and click on it.
5. In the crop menu, scroll down to Aspect Ratio to convert the shape to the correct proportions
6. Drag the photo within the shape to create your perfect composition.
Voila! You’ve instantly transformed your image into a more interesting piece of your presentation puzzle.
If you want to take it a step further by choosing how the picture fits in the shape, you can use the Fit and Fill tools for fine-tuning. Fit makes the entire picture fit within the shape. The original picture aspect ratio is maintained, but you may have empty space inside your shape. Fill removes (or “crops”) part of the picture, but still fills the entire shape.
Have an extra minute? Take some time to explore the rest of our YouTube tutorials if you’re curious about other ways to shake it up. And, as always, if you’d rather have someone do this for you, don’t hesitate to reach out! Our presentation designers are at-the-ready, and always excited to listen to your vision, then make it come to life. Let us know what you need, and we’ll have a free quote to you within two hours of our call!
