There’s a time and place for using flat color backgrounds. However, taking a little extra time to make a more interesting setting using unique patterns and subtle imagery can really pay off. No, we don’t mean the pre-installed PowerPoint backgrounds that were introduced in the 90’s. If you’re feeling like you don’t know where to start mixing it up, let us help with this quick tutorial on how to amplify your bland backgrounds.
Image sourcing
First, try going to a source for free images like unsplash.com and search “pattern” or “texture.” You’ll get a beautiful array of photography with nice, abstract subject matter. Choose an interesting image. If you’re having a hard time, choose a couple for practice! After a few different tries you’ll realize which images work best to transform your bland backgrounds and which detract from your messaging.
Messaging
Next, you will most likely need to tailor the image to fit your message. While some of the images might be ready as-is for your message to sit on, more than likely, you’ll need to adjust the contrast so your text will be legible. The easiest way is to use a color overlay. This gives you the best of both worlds, avoiding a bland background while also letting the text shine. Let’s dive into a tutorial that will help you make virtually any background work with your copy.
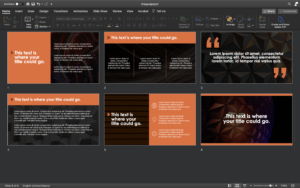
Step 1- Insert the image onto a slide
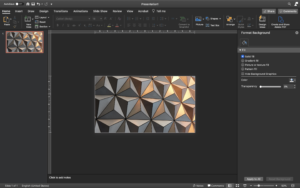
Drag your first chosen image from its destination to your blank PowerPoint slide making sure it fills the entire space. Your image size should be 1024 x 768 pixels.
Step 2- Create a shape and format it
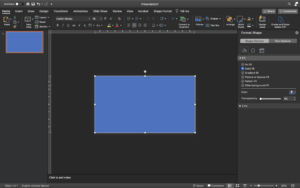
Once you’ve inserted your background image into the slide, go ahead and add a rectangle shape on top. Navigate to “Insert” in the toolbar. Then, click Shape and select rectangle. Resize the rectangle until it completely covers the slide and image.
Microsoft’s default shape is blue with a stroke. You’ll want to delete that. Find the Shape Outline button and select “No Outline”.
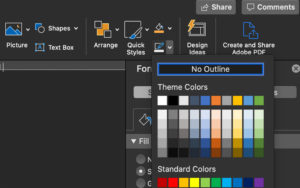
Next, we changed the rectangle’s color to black. You could use white, a color from your own palette, or utilize the eyedrop tool to select a color within the picture.

Step 3- Adjust the transparency of your shape
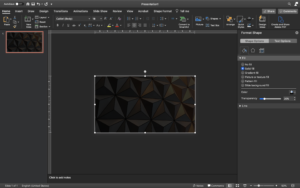
Finally, with the shape selected, find the “Transparency” slider under “Format Shape.” Drag it to somewhere between 8-25%. That should allow the image to peek through just enough while making sure your content is legible.
Templates
An excellent, useful application for this is when creating templates. You can even use your bland backgrounds as a starting point! Combining a flat color with subtle imagery is a quick and simple way to create an engaging, customized, cohesive template for your presentation.
Your bland background is just the starting point for an interesting presentation! You don’t have to start from scratch, you can utilize what you already have and build it into something more interesting. Try expanding your image choices to include company photography or meaningful photography once you’re more comfortable. Need help? Our design team is at the ready. Reach out today for a free quote!
